
 004.Binder 服务注册过程情景分析之 C 语言篇
本文基于 Android 10 源码环境。
在Binder 示例程序之 C 语言篇 (opens new window)中我们介绍了使用 C 语言完成的最简单的 Binder 示例程序,接下来我们开始详细分析这个示例中服务注册的过程。
服务的注册过程分为以下几个步骤:
- 系统启动 ServiceManager
- Server 端发起服务注册请求
- ServiceManager 收到服务注册请求,完成服务注册,发送应答消息给 Server
- Server 收到并处理应答数据
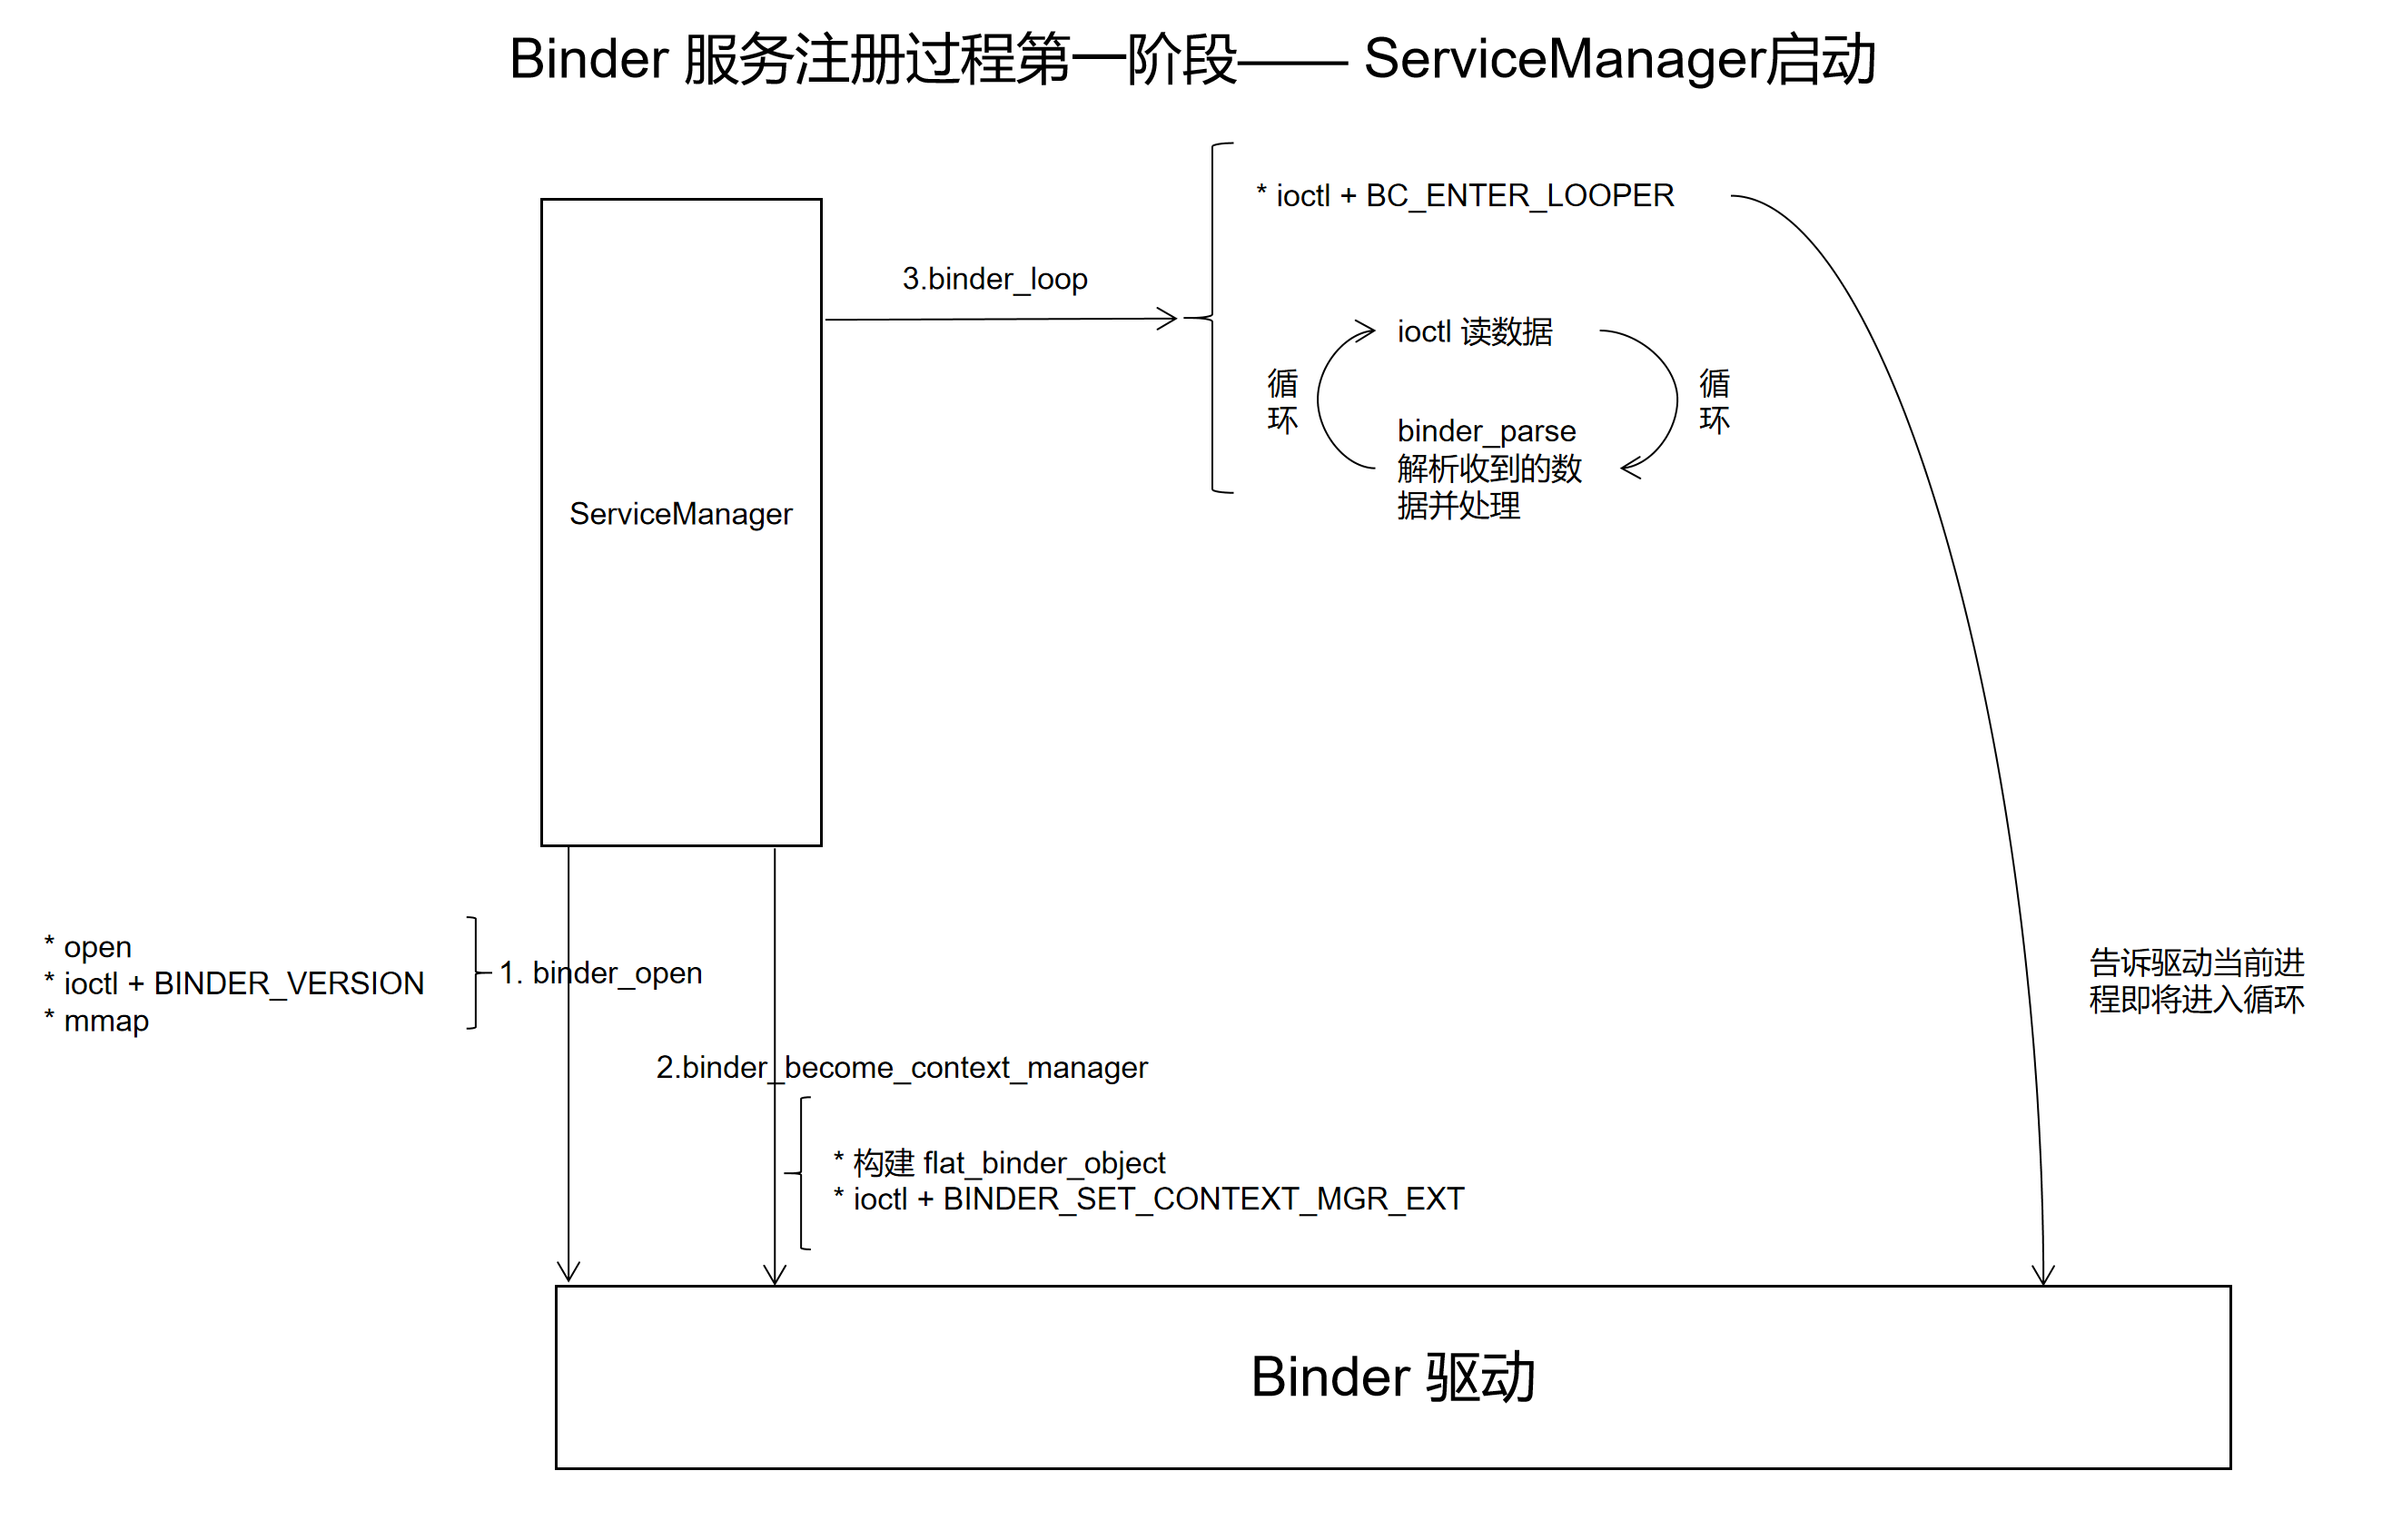
# 1. Binder 服务注册过程第一阶段——ServiceManager 启动
ServerManager由系统实现,对应的代码在:frameworks/native/cmds/servicemanager/service_manager.c
int main(int argc, char** argv)
{
    struct binder_state *bs;
    char *driver;
    if (argc > 1) {
        driver = argv[1];
    } else {
        driver = "/dev/binder";
    }
    //关注点1,初始化 binder 驱动
    bs = binder_open(driver, 128*1024);
    if (!bs) {
        //省略 VENDORSERVICEMANAGER 相关代码 ......
        ALOGE("failed to open binder driver %s\n", driver);
        return -1;
    }
    //关注点2, 注册当前进程为 context_manager
    if (binder_become_context_manager(bs)) {
        ALOGE("cannot become context manager (%s)\n", strerror(errno));
        return -1;
    }
    // 省略 selinux 相关代码 ......
    //关注点3
    //进入循环,等待远程调用
    //svcmgr_handler 是一个函数指针,是远程调用的回调函数
    binder_loop(bs, svcmgr_handler);
    return 0;
}
2
3
4
5
6
7
8
9
10
11
12
13
14
15
16
17
18
19
20
21
22
23
24
25
26
27
28
- 关注点1:调用
binder_open函数,完成驱动初始化 - 关注点2:通过
binder_become_context_manager函数将当前线程注册为 contextmanager - 关注点3:进入循环,调用
binder_loop函数进入循环
整体工作流程如下图所示:
# 1.1 binder_open 实现分析
关注点1调用 binder_open 完成 Binder 驱动初始化。
binder_open 的使用方法如下:
bs = binder_open("/dev/binder", 128*1024);
binder_open 的实现如下:
// driver 通常是 "/dev/binder"
// mapsize 是需要 mmap 的内存的大小
struct binder_state *binder_open(const char* driver, size_t mapsize)
{
    struct binder_state *bs; //用于存需要返回的值
    struct binder_version vers;

    bs = malloc(sizeof(*bs));
    if (!bs) {
        errno = ENOMEM;
        return NULL;
    }

    //O_CLOEXEC 是一种标志,用于在打开文件时告诉操作系统,当调用 exec 函数时该文件描述符应该被关闭。O_CLOEXEC 的作用是避免文件描述符被继承到子进程中。
    //打开 /dev/binder,拿到内核返回的句柄
    bs->fd = open(driver, O_RDWR | O_CLOEXEC);
    if (bs->fd < 0) {
        fprintf(stderr,"binder: cannot open %s (%s)\n",
                driver, strerror(errno));
        goto fail_open;
    }

    //查询版本
    if ((ioctl(bs->fd, BINDER_VERSION, &vers) == -1) ||
        (vers.protocol_version != BINDER_CURRENT_PROTOCOL_VERSION)) {
        fprintf(stderr,
                "binder: kernel driver version (%d) differs from user space version (%d)\n",
                vers.protocol_version, BINDER_CURRENT_PROTOCOL_VERSION);
        goto fail_open;
    }

    //完成内存映射
    bs->mapsize = mapsize;
    bs->mapped = mmap(NULL, mapsize, PROT_READ, MAP_PRIVATE, bs->fd, 0);
    if (bs->mapped == MAP_FAILED) {
        fprintf(stderr,"binder: cannot map device (%s)\n",
                strerror(errno));
        goto fail_map;
    }

    return bs;

fail_map:
    close(bs->fd);
fail_open:
    free(bs);
    return NULL;
}
2
3
4
5
6
7
8
9
10
11
12
13
14
15
16
17
18
19
20
21
22
23
24
25
26
27
28
29
30
31
32
33
34
35
36
37
38
39
40
41
42
43
44
45
46
47
48
其中 struct binder_state *bs 结构如下:
struct binder_state
{
    int fd;
    void *mapped;
    size_t mapsize;
};
2
3
4
5
6
用于保存 binder_open 的返回结果。
binder_open 的工作比较简单,分为以下几步:
- 通过系统调用 open() 来打开
/dev/binder,获得一个文件句柄信息。 - 通过 ioctl 获取 binder 的版本信息,比较 binder 协议版本是否相同,不同则跳出。
- 通过 mmap 内存映射 128K 的内存空间,即把 binder 驱动文件的 128K 字节映射到了内存空间。
很多面试喜欢问 binder 数据传输大小的限制,答案就在 binder mmap 函数的第二个参数,对于 ServiceManager 来说限制就是 128k(传输大小限制分多种情况,会在面试题部分详细讲解)。
# 1.2 binder_become_context_manager 实现分析
关注点2调用 binder_become_context_manager 函数,将当前进程注册为整个系统中唯一的上下文管理器。
具体实现如下:
int binder_become_context_manager(struct binder_state *bs)
{
    //构建需要发送的数据 flat_binder_object
    struct flat_binder_object obj;
    memset(&obj, 0, sizeof(obj));
    obj.flags = FLAT_BINDER_FLAG_TXN_SECURITY_CTX;

    //向 Binder 驱动发送数据
    int result = ioctl(bs->fd, BINDER_SET_CONTEXT_MGR_EXT, &obj);

    //如果失败,使用原始方式再次调用 ioctl
    // fallback to original method
    if (result != 0) {
        android_errorWriteLog(0x534e4554, "121035042");

        result = ioctl(bs->fd, BINDER_SET_CONTEXT_MGR, 0);
    }
    return result;
}
2
3
4
5
6
7
8
9
10
11
12
13
14
15
16
17
18
19
流程如下:
- 构建需要发送的结构体 flat_binder_object
- 通过 ioctl 将构造好的数据发送给 Binder 驱动,使用的协议是 BINDER_SET_CONTEXT_MGR_EXT
- 如果失败,使用原始方式再次调用 ioctl
# 1.3 binder_loop 实现分析
关注点3 调用 binder_loop 进入循环,等待远程调用。
binder_loop 的实现如下:
void binder_loop(struct binder_state *bs, binder_handler func)
{
    int res;
    //ioctl 读写数据类型
    struct binder_write_read bwr;
    uint32_t readbuf[32];

    bwr.write_size = 0;
    bwr.write_consumed = 0;
    bwr.write_buffer = 0;

    //告诉驱动,应用程序要进入循环了
    readbuf[0] = BC_ENTER_LOOPER;
    //ioctl 的基本封装
    binder_write(bs, readbuf, sizeof(uint32_t));

    for (;;) {
        //从驱动读数据
        bwr.read_size = sizeof(readbuf);
        bwr.read_consumed = 0;
        bwr.read_buffer = (uintptr_t) readbuf;

        res = ioctl(bs->fd, BINDER_WRITE_READ, &bwr);

        if (res < 0) {
            ALOGE("binder_loop: ioctl failed (%s)\n", strerror(errno));
            break;
        }

        //解析收到的数据,func 是解析好数据后的回调函数
        res = binder_parse(bs, 0, (uintptr_t) readbuf, bwr.read_consumed, func);
        if (res == 0) {
            ALOGE("binder_loop: unexpected reply?!\n");
            break;
        }
        if (res < 0) {
            ALOGE("binder_loop: io error %d %s\n", res, strerror(errno));
            break;
        }
    }
}
2
3
4
5
6
7
8
9
10
11
12
13
14
15
16
17
18
19
20
21
22
23
24
25
26
27
28
29
30
31
32
33
34
35
36
37
38
39
40
41
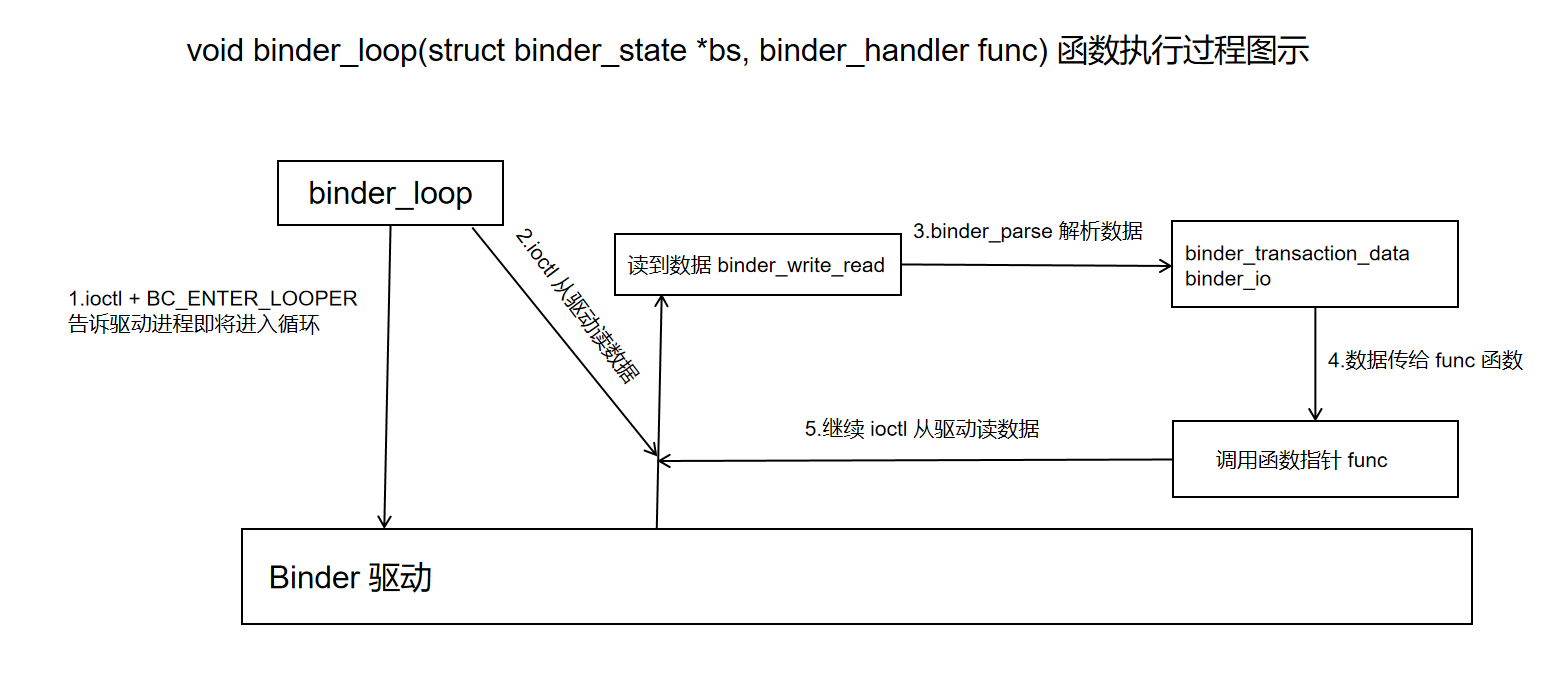
- 调用 ioctl + BC_ENTER_LOOPER 告诉驱动,应用进程即将进入循环
- 进入 for 循环,ioctl + BINDER_WRITE_READ 向驱动读取数据,读到的数据格式为 binder_write_read
- 调用 binder_parse 会解析 binder_write_read,并将其转换为 binder_transaction_data 和 binder_io
- 调用 func 函数指针,并将解析好的数据 binder_transaction_data 和 binder_io 传给 func 函数
- 进入下一个循环周期,继续从驱动读取数据
进程调用 binder_loop 后,会进入读取数据,解析数据的循环。这样 Binder Server 才能一直运行下去。
ServiceManager中,binder_loop 的调用方式如下:
binder_loop(bs, svcmgr_handler);
其中 svcmgr_handler 是一个函数指针,是收到远程调用后的回调,其实现如下:
//txn_secctx msg 是调用方发来的数据
//reply 是返回给调用方的数据
int svcmgr_handler(struct binder_state *bs,
                   struct binder_transaction_data_secctx *txn_secctx,
                   struct binder_io *msg,
                   struct binder_io *reply)
{
    //......
}
2
3
4
5
6
7
8
9
调用 binder_loop 后,进程收到的 binder 数据格式为 binder_write_read,将数据解析为 binder_transaction_data_secctx binder_io 后就会调用 binder_loop 传入的函数指针,并传入解析好的数据。
接下来我们先分析 binder_loop 涉及到的数据结构:
binder_io 可以理解为一个数据集合,数据发送端将数据按照一定的顺序写入集合,数据接受端按照相同的顺序读取数据。
binder_io 的使用方法如下:
数据发送端:
unsigned iodata[512/4];
struct binder_io msg;

/* 构造binder_io */
bio_init(&msg, iodata, sizeof(iodata), 4);
bio_put_uint32(&msg, 0);  // strict mode header
bio_put_string16_x(&msg, "IHelloService");

/* 放入参数 */
bio_put_string16_x(&msg, name);
2
3
4
5
6
7
8
9
10
数据接收端:
strict_policy = bio_get_uint32(msg);
s = bio_get_string16(msg, &len);  //"IHelloService"
s = bio_get_string16(msg, &len);  // name
2
3
接下来我们看看 binder_io 的具体实现:
struct binder_io
{
    char *data;            /* pointer to read/write from */
    binder_size_t *offs;   /* array of offsets */
    size_t data_avail;     /* bytes available in data buffer */
    size_t offs_avail;     /* entries available in offsets array */

    char *data0;           /* start of data buffer */
    binder_size_t *offs0;  /* start of offsets buffer */
    uint32_t flags;
    uint32_t unused;
};
2
3
4
5
6
7
8
9
10
11
12
binder_io 的初始化过程:
//初始化过程
unsigned iodata[512/4];
struct binder_io msg;
//初始化 binder_io
bio_init(&msg, iodata, sizeof(iodata), 4);

void bio_init(struct binder_io *bio, void *data,
              size_t maxdata, size_t maxoffs)
{
    size_t n = maxoffs * sizeof(size_t);

    //溢出处理
    if (n > maxdata) {
        bio->flags = BIO_F_OVERFLOW;
        bio->data_avail = 0;
        bio->offs_avail = 0;
        return;
    }

    //将 bio 一分为二
    bio->data = bio->data0 = (char *) data + n;
    bio->offs = bio->offs0 = data;
    bio->data_avail = maxdata - n;
    bio->offs_avail = maxoffs;
    bio->flags = 0;
}
2
3
4
5
6
7
8
9
10
11
12
13
14
15
16
17
18
19
20
21
22
23
24
25
26
从 binder_io 的定义和初始化过程中可以看出,binder_io 用于管理一块内存,同时将内存分为了两部分管理:
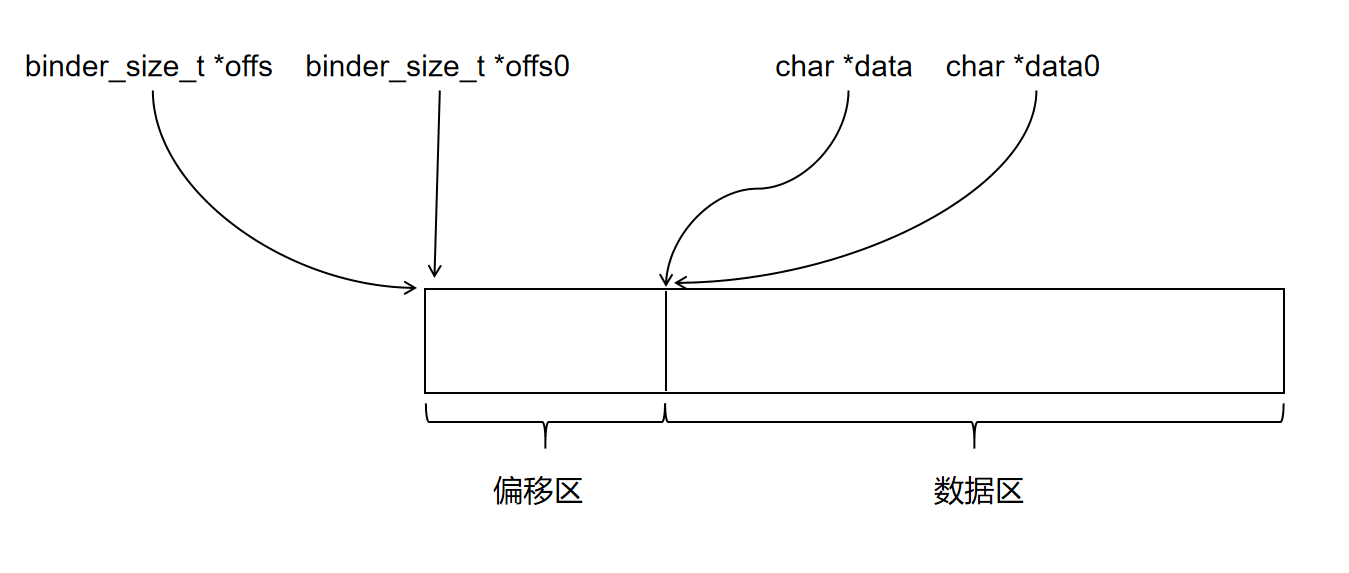
为方便叙述,本文称这两个区为偏移区和数据区。
maxdata 是这块内存总的字节数,偏移区的大小为 n 字节,其中 n = maxoffs * sizeof(size_t),数据区的大小为 maxdata - n
两块内存如何使用?
接下来我们看看如何将一个 unit32_t 数据存入 binder_io:
void bio_put_uint32(struct binder_io *bio, uint32_t n)
{
    //分配内存
    uint32_t *ptr = bio_alloc(bio, sizeof(n));
    if (ptr)
        *ptr = n;
}


//在 binder_io 的第二部分分配 size 大小的内存
static void *bio_alloc(struct binder_io *bio, size_t size)
{
    //size 最终等于 4,8,12,16,20 ......
    //size 的值比原始的值大
    size = (size + 3) & (~3);
    //溢出操作
    if (size > bio->data_avail) {
        bio->flags |= BIO_F_OVERFLOW;
        return NULL;
    } else {
        //分配位置
        void *ptr = bio->data;
        bio->data += size;
        bio->data_avail -= size;
        return ptr;
    }
}
2
3
4
5
6
7
8
9
10
11
12
13
14
15
16
17
18
19
20
21
22
23
24
25
26
27
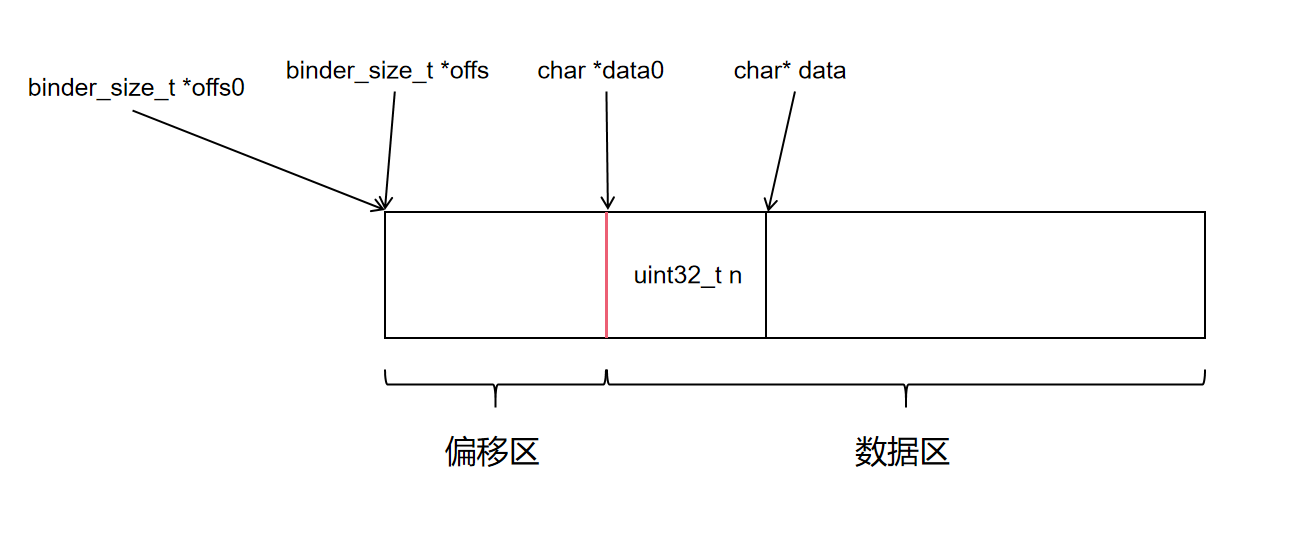
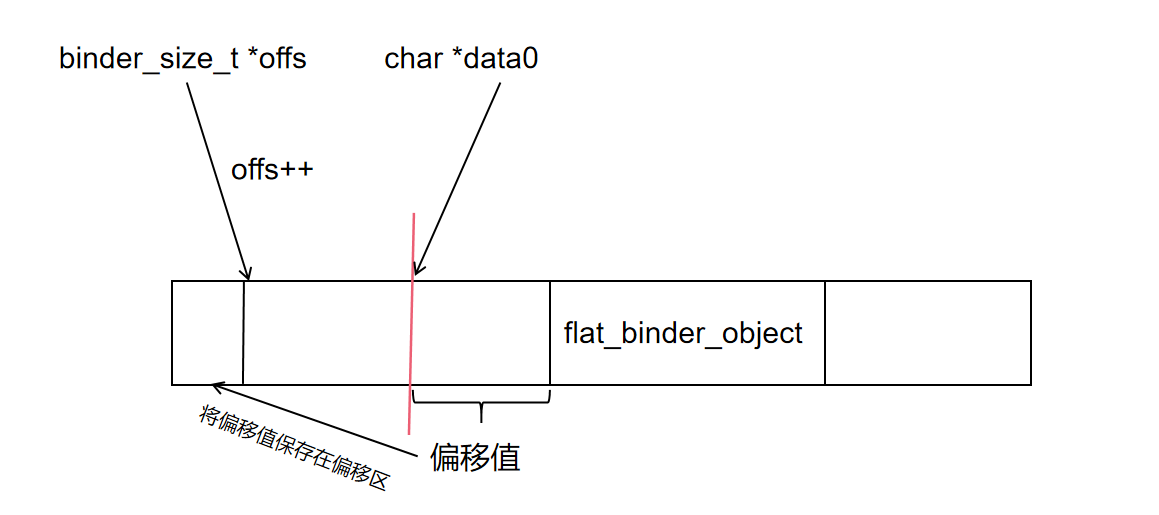
写入一个 32 位整数的过程如下:
- 在数据区分配 4 字节倍数的数据
- 将整数值写入已分配的内存
写入后一个 uint32_t n 后,内存结构如下图所示:
字符串的写入稍微复杂一点,但是本质原理和写入 unit_32 相同,有兴趣的同学可以自行分析下面的代码:
void bio_put_string16_x(struct binder_io *bio, const char *_str)
{
    unsigned char *str = (unsigned char*) _str;
    size_t len;
    uint16_t *ptr;

    if (!str) {
        bio_put_uint32(bio, 0xffffffff);
        return;
    }

    len = strlen(_str);

    if (len >= (MAX_BIO_SIZE / sizeof(uint16_t))) {
        bio_put_uint32(bio, 0xffffffff);
        return;
    }

    /* Note: The payload will carry 32bit size instead of size_t */
    bio_put_uint32(bio, len);
    ptr = bio_alloc(bio, (len + 1) * sizeof(uint16_t));
    if (!ptr)
        return;

    while (*str)
        *ptr++ = *str++;
    *ptr++ = 0;
}
2
3
4
5
6
7
8
9
10
11
12
13
14
15
16
17
18
19
20
21
22
23
24
25
26
27
28
接下来我们看看,如何在 binder_io 中存一个指针数据。(在服务注册场景下,这个指针指向一个函数,是 server 端收到调用后的回调函数)
void bio_put_obj(struct binder_io *bio, void *ptr)
{
    struct flat_binder_object *obj;

    //分配内存
    obj = bio_alloc_obj(bio);
    if (!obj)
        return;

    obj->flags = 0x7f | FLAT_BINDER_FLAG_ACCEPTS_FDS;
    obj->hdr.type = BINDER_TYPE_BINDER;
    //ptr 保存在 flat_binder_object 的 binder 成员中
    obj->binder = (uintptr_t)ptr;
    obj->cookie = 0;
}


static struct flat_binder_object *bio_alloc_obj(struct binder_io *bio)
{
    struct flat_binder_object *obj;
    //在数据区分配内存
    obj = bio_alloc(bio, sizeof(*obj));

    //在第一部分保存偏移量
    if (obj && bio->offs_avail) {
        bio->offs_avail--;
        *bio->offs++ = ((char*) obj) - ((char*) bio->data0);
        return obj;
    }

    bio->flags |= BIO_F_OVERFLOW;
    return NULL;
}

struct flat_binder_object {
	struct binder_object_header	hdr;
	__u32				flags;

	/* 8 bytes of data. */
	union {
		binder_uintptr_t	binder;	/* local object */
		__u32			handle;	/* remote object */
	};

	/* extra data associated with local object */
	binder_uintptr_t	cookie;
};

struct binder_object_header {
	__u32        type;
};
2
3
4
5
6
7
8
9
10
11
12
13
14
15
16
17
18
19
20
21
22
23
24
25
26
27
28
29
30
31
32
33
34
35
36
37
38
39
40
41
42
43
44
45
46
47
48
49
50
51
52
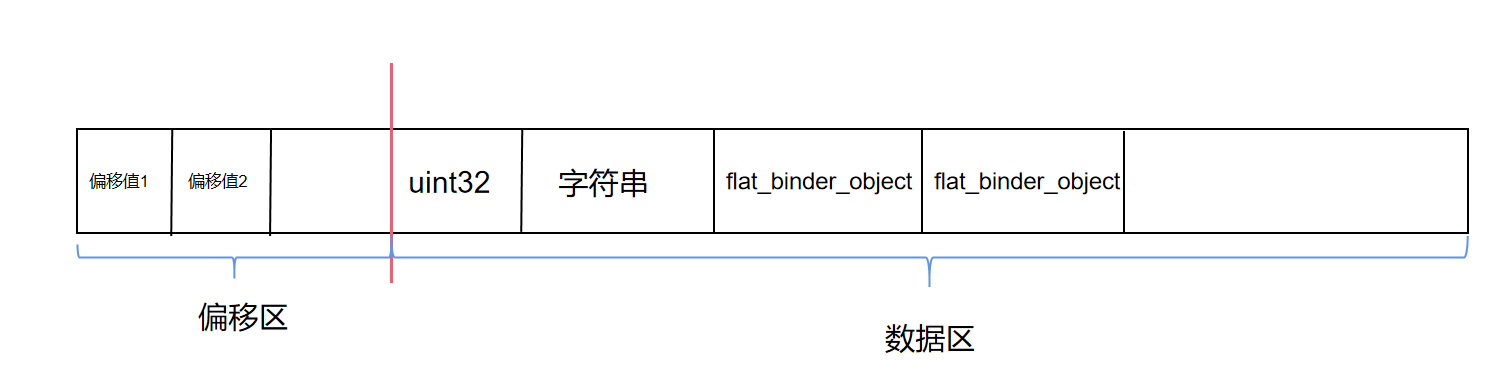
对于指针类型,会在数据区分配一个 flat_binder_object 结构体的数据,将指针数据保存在结构体的 binder 成员中。在偏移区将 flat_binder_object 相对 data0 的偏移值保存在 offs 指向的内存,offs 再加 1。完成数据保存后,其内存结构如下图所示:
这里给出一个 binder_io 结构示例,以加深理解:
binder_transaction_data_secctx 是一个简单的封装,我们需要的数据大部分都保存在 binder_transaction_data 中:
struct binder_transaction_data_secctx {
	struct binder_transaction_data transaction_data;
	binder_uintptr_t secctx;
};

struct binder_transaction_data {
	union {
		__u32	handle;
		binder_uintptr_t ptr;
	} target;
	binder_uintptr_t	cookie;
	__u32		code;

	__u32	        flags;
	pid_t		sender_pid;
	uid_t		sender_euid;
	binder_size_t	data_size;
	binder_size_t	offsets_size;

	union {
		struct {
			binder_uintptr_t	buffer;
			binder_uintptr_t	offsets;
		} ptr;
		__u8	buf[8];
	} data;
};
2
3
4
5
6
7
8
9
10
11
12
13
14
15
16
17
18
19
20
21
22
23
24
25
26
27
接下来再回头来看 binder_loop 具体实现:
void binder_loop(struct binder_state *bs, binder_handler func)
{
    int res;
    //ioctl 读写数据类型
    struct binder_write_read bwr;
    uint32_t readbuf[32];

    bwr.write_size = 0;
    bwr.write_consumed = 0;
    bwr.write_buffer = 0;

    //告诉驱动,应用程序要进入循环了
    readbuf[0] = BC_ENTER_LOOPER;
    //ioctl 的基本封装
    binder_write(bs, readbuf, sizeof(uint32_t));

    for (;;) {
        //结合上面 bwr 的赋值,这里是要读数据
        bwr.read_size = sizeof(readbuf);
        bwr.read_consumed = 0;
        bwr.read_buffer = (uintptr_t) readbuf;
        //向驱动发起读操作
        res = ioctl(bs->fd, BINDER_WRITE_READ, &bwr);

        if (res < 0) {
            ALOGE("binder_loop: ioctl failed (%s)\n", strerror(errno));
            break;
        }

        res = binder_parse(bs, 0, (uintptr_t) readbuf, bwr.read_consumed, func);
        if (res == 0) {
            ALOGE("binder_loop: unexpected reply?!\n");
            break;
        }
        if (res < 0) {
            ALOGE("binder_loop: io error %d %s\n", res, strerror(errno));
            break;
        }
    }
}

//binder_write 是对 ioctl + BINDER_WRITE_READ 写操作的简单封装
int binder_write(struct binder_state *bs, void *data, size_t len)
{
    struct binder_write_read bwr;
    int res;

    bwr.write_size = len;
    bwr.write_consumed = 0;
    bwr.write_buffer = (uintptr_t) data;
    bwr.read_size = 0;
    bwr.read_consumed = 0;
    bwr.read_buffer = 0;
    res = ioctl(bs->fd, BINDER_WRITE_READ, &bwr);
    if (res < 0) {
        fprintf(stderr,"binder_write: ioctl failed (%s)\n",
                strerror(errno));
    }
    return res;
}
2
3
4
5
6
7
8
9
10
11
12
13
14
15
16
17
18
19
20
21
22
23
24
25
26
27
28
29
30
31
32
33
34
35
36
37
38
39
40
41
42
43
44
45
46
47
48
49
50
51
52
53
54
55
56
57
58
59
60
binder_loop 调用 ioctl 读取数据,当前线程阻塞在此处直到有 ioctl 收到服务相关的远程调用请求。
# 2. Binder 服务注册过程第二阶段——Server 端发起服务注册请求
Server 端发起服务注册请求的流程如下图所示:
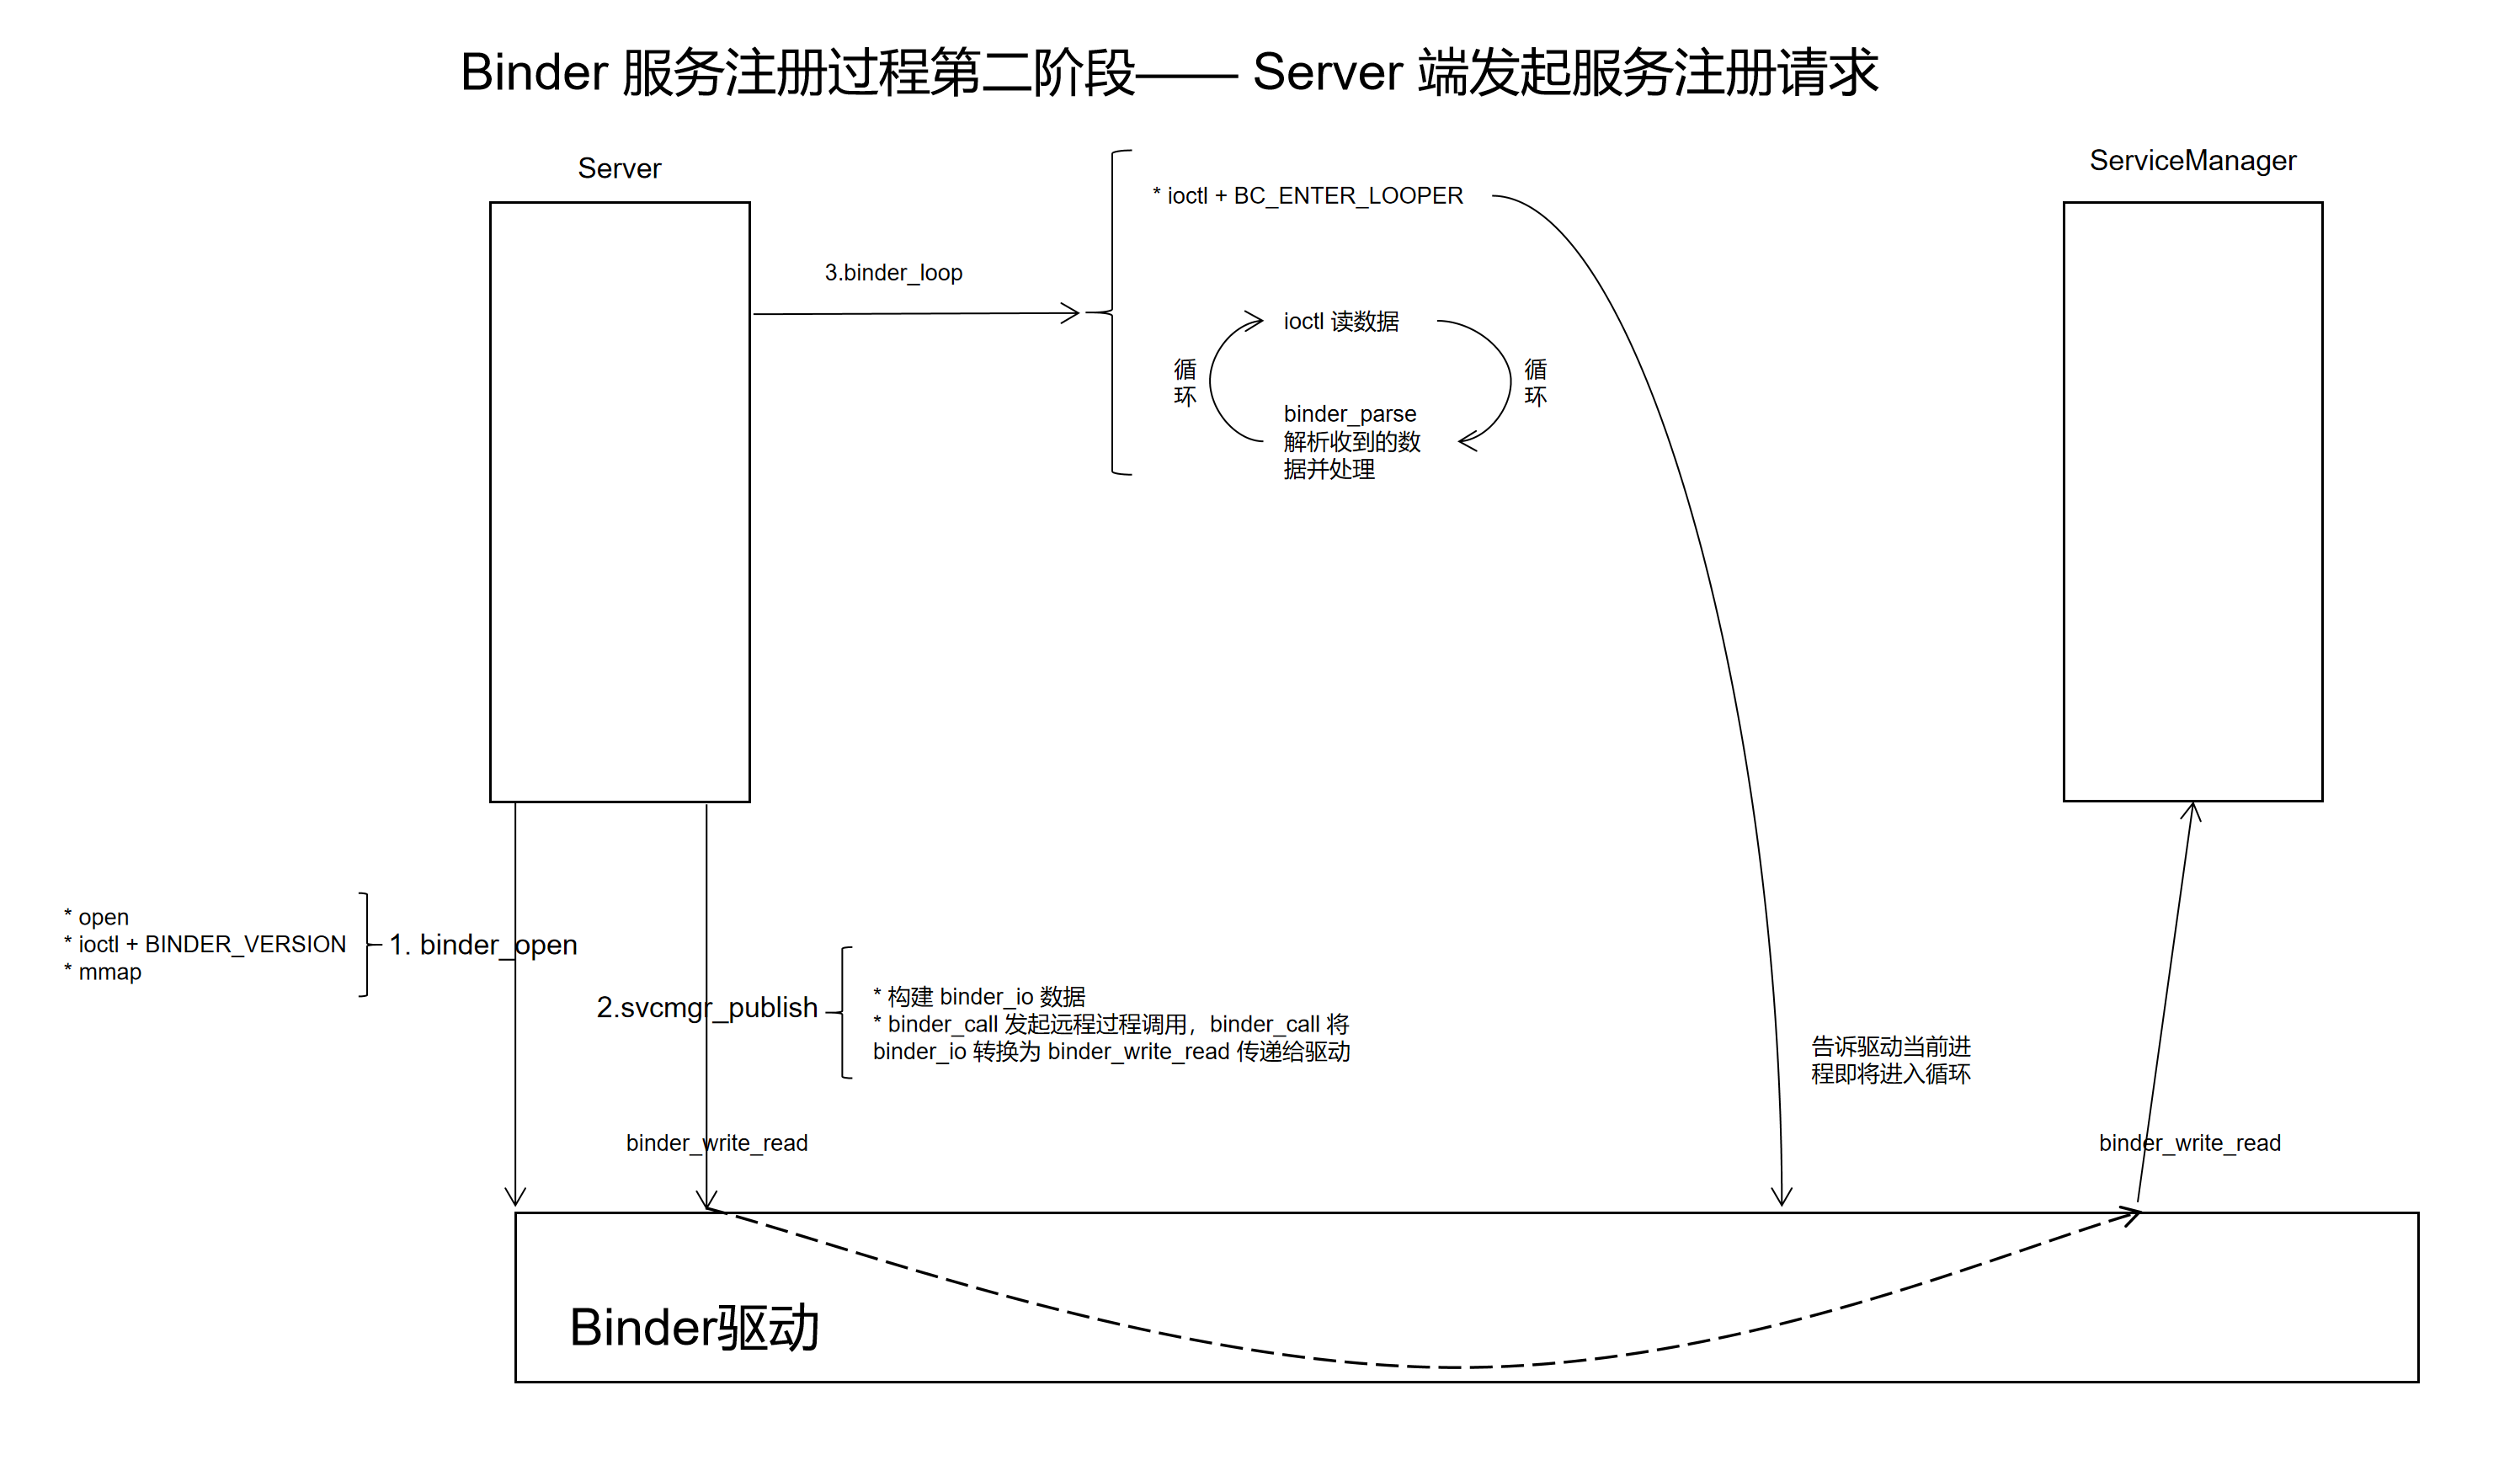
Server 端发起服务注册请求的代码:
int main(int argc, char **argv)
{
    struct binder_state *bs;
    uint32_t svcmgr = BINDER_SERVICE_MANAGER;
    uint32_t handle;
	int ret;

    //打开驱动
    bs = binder_open("/dev/binder", 128*1024);
    if (!bs) {
        fprintf(stderr, "failed to open binder driver\n");
        return -1;
    }

	//添加服务
	ret = svcmgr_publish(bs, svcmgr, "hello", hello_service_handler);
    if (ret) {
        fprintf(stderr, "failed to publish hello service\n");
        return -1;
    }

    binder_loop(bs, test_server_handler);

    return 0;
}
2
3
4
5
6
7
8
9
10
11
12
13
14
15
16
17
18
19
20
21
22
23
24
25
整个流程分为一下几步;
- binder_open 初始化
- svcmgr_publish 注册函数,需要提供一个参数 hello_service_handler,也就是我们自己写的回调函数
- 调用 binder_loop 进入循环,等待远程调用
binder_open 和 binder_loop 在上一节已做分析,这里我们接着分析 svcmgr_publish 的实现:
int svcmgr_publish(struct binder_state *bs, uint32_t target, const char *name, void *ptr)
{
    int status;
    unsigned iodata[512/4];
    struct binder_io msg, reply;

    bio_init(&msg, iodata, sizeof(iodata), 4);
    bio_put_uint32(&msg, 0);  // strict mode header
    bio_put_uint32(&msg, 0);
    bio_put_string16_x(&msg, SVC_MGR_NAME);
    bio_put_string16_x(&msg, name);
    bio_put_obj(&msg, ptr);
    bio_put_uint32(&msg, 0);
    bio_put_uint32(&msg, 0);

    //通过 binder_call 发起远程函数调用
    if (binder_call(bs, &msg, &reply, target, SVC_MGR_ADD_SERVICE)) {
        //fprintf(stderr, "svcmgr_public 远程调用失败\n");
        return -1;
    }

    //解析返回值
    status = bio_get_uint32(&reply); //调用成功返回0
    //远程调用结束,通知驱动清理内存
    binder_done(bs, &msg, &reply);

    return status;
}
2
3
4
5
6
7
8
9
10
11
12
13
14
15
16
17
18
19
20
21
22
23
24
25
26
27
28
svcmgr_publish 工作流程如下:
- 通过 binder_io 构造需要发送的数据 msg
- 通过 binder_call 发起远程调用
- 解析回复的数据,通过 binder_done 函数通知驱动通信完成,清理内存
其核心功能通过 binder_call 实现,binder_call 用于发起远程过程调用,其调用过程如下:
//调用过程
// bs 是 binder_open 的返回值
// msg 是上面代码构造的 binder_io 结构体
// reply 是被调用方的返回数据
// target 是一个整型变量,用于指定要访问哪个进程
// SVC_MGR_ADD_SERVICE 表示我们要调用远程进程的 addservice 函数
binder_call(bs, &msg, &reply, target, SVC_MGR_ADD_SERVICE)

//函数结构
int binder_call(struct binder_state *bs,
                struct binder_io *msg, struct binder_io *reply,
                uint32_t target, uint32_t code)
{
    //......
}
2
3
4
5
6
7
8
9
10
11
12
13
14
15
16
接下来我们来分析 binder_call 的具体实现:
//binder_call 中的构造过程
int binder_call(struct binder_state *bs,
                struct binder_io *msg, struct binder_io *reply,
                uint32_t target, uint32_t code)
{
    int res;

    //关注点1 binder_io *msg 转为 binder_write_read
    //声明数据
    struct binder_write_read bwr;

    //binder_write_read 内部成员 write_buffer 的结构
    struct {
        uint32_t cmd;
        struct binder_transaction_data txn;
    } __attribute__((packed)) writebuf;

    unsigned readbuf[32];

    //...... 省略非核心代码

    //构造 binder_write_read 内部结构 writebuf
    // BC_TRANSACTION 表示当前数据是用于发起远程调用
    writebuf.cmd = BC_TRANSACTION;
    // target 用于找到远程进程,即我们要调用哪个进程的函数
    writebuf.txn.target.handle = target;
    // code 表示调用哪个函数
    writebuf.txn.code = code;
    writebuf.txn.flags = 0;
    writebuf.txn.data_size = msg->data - msg->data0;
    writebuf.txn.offsets_size = ((char*) msg->offs) - ((char*) msg->offs0);
    //data 是数据区,指向一个 binder_io 结构体
    writebuf.txn.data.ptr.buffer = (uintptr_t)msg->data0;
    writebuf.txn.data.ptr.offsets = (uintptr_t)msg->offs0;

    //给 write 相关变量赋值
    //表示当前进程是写入数据,即发送数据
    bwr.write_size = sizeof(writebuf);
    bwr.write_consumed = 0;
    bwr.write_buffer = (uintptr_t) &writebuf;

    hexdump(msg->data0, msg->data - msg->data0);
    for (;;) {
        //关注点2 写的同时也要读数据
        //给 read 相关变量赋值
        //同时,我们也要读取返回的结果值
        bwr.read_size = sizeof(readbuf);
        bwr.read_consumed = 0;
        bwr.read_buffer = (uintptr_t) readbuf;

        //关注点3 发起读写操作
        //发送 binder_write_read 数据
        res = ioctl(bs->fd, BINDER_WRITE_READ, &bwr);

        if (res < 0) {
            fprintf(stderr,"binder: ioctl failed (%s)\n", strerror(errno));
            goto fail;
        }

        //省略部分代码 ......
        //关注点4 解析收到的数据 readbuf
        // res = binder_parse(bs, reply, (uintptr_t) readbuf, bwr.read_consumed, 0);
        // if (res == 0) return 0;
        // if (res < 0) goto fail;
    }

fail:
    memset(reply, 0, sizeof(*reply));
    reply->flags |= BIO_F_IOERROR;
    return -1;
}

//binder_write_read 结构体定义如下
struct binder_write_read {
	binder_size_t		write_size;	/* bytes to write */
	binder_size_t		write_consumed;	/* bytes consumed by driver */
	binder_uintptr_t	write_buffer;

	binder_size_t		read_size;	/* bytes to read */
	binder_size_t		read_consumed;	/* bytes consumed by driver */
	binder_uintptr_t	read_buffer;
};

struct binder_transaction_data {
	union {
		__u32	handle;
		binder_uintptr_t ptr;
	} target;
	binder_uintptr_t	cookie;
	__u32		code;

	__u32	        flags;
	pid_t		sender_pid;
	uid_t		sender_euid;
	binder_size_t	data_size;
	binder_size_t	offsets_size;

	union {
		struct {
			binder_uintptr_t	buffer;
			binder_uintptr_t	offsets;
		} ptr;
		__u8	buf[8];
	} data;
};
2
3
4
5
6
7
8
9
10
11
12
13
14
15
16
17
18
19
20
21
22
23
24
25
26
27
28
29
30
31
32
33
34
35
36
37
38
39
40
41
42
43
44
45
46
47
48
49
50
51
52
53
54
55
56
57
58
59
60
61
62
63
64
65
66
67
68
69
70
71
72
73
74
75
76
77
78
79
80
81
82
83
84
85
86
87
88
89
90
91
92
93
94
95
96
97
98
99
100
101
102
103
104
105
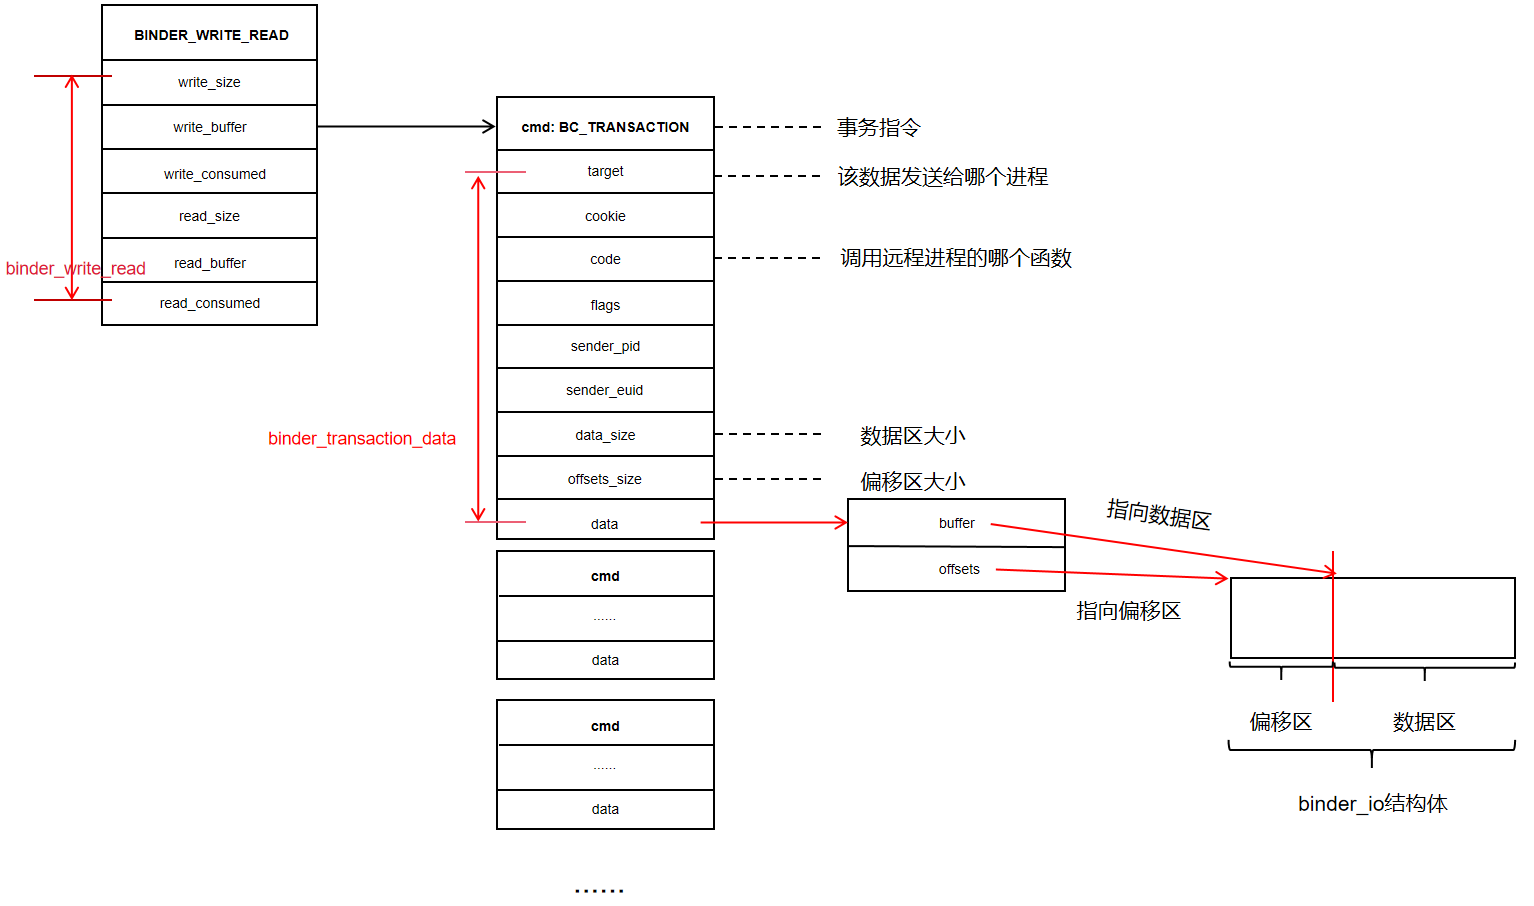
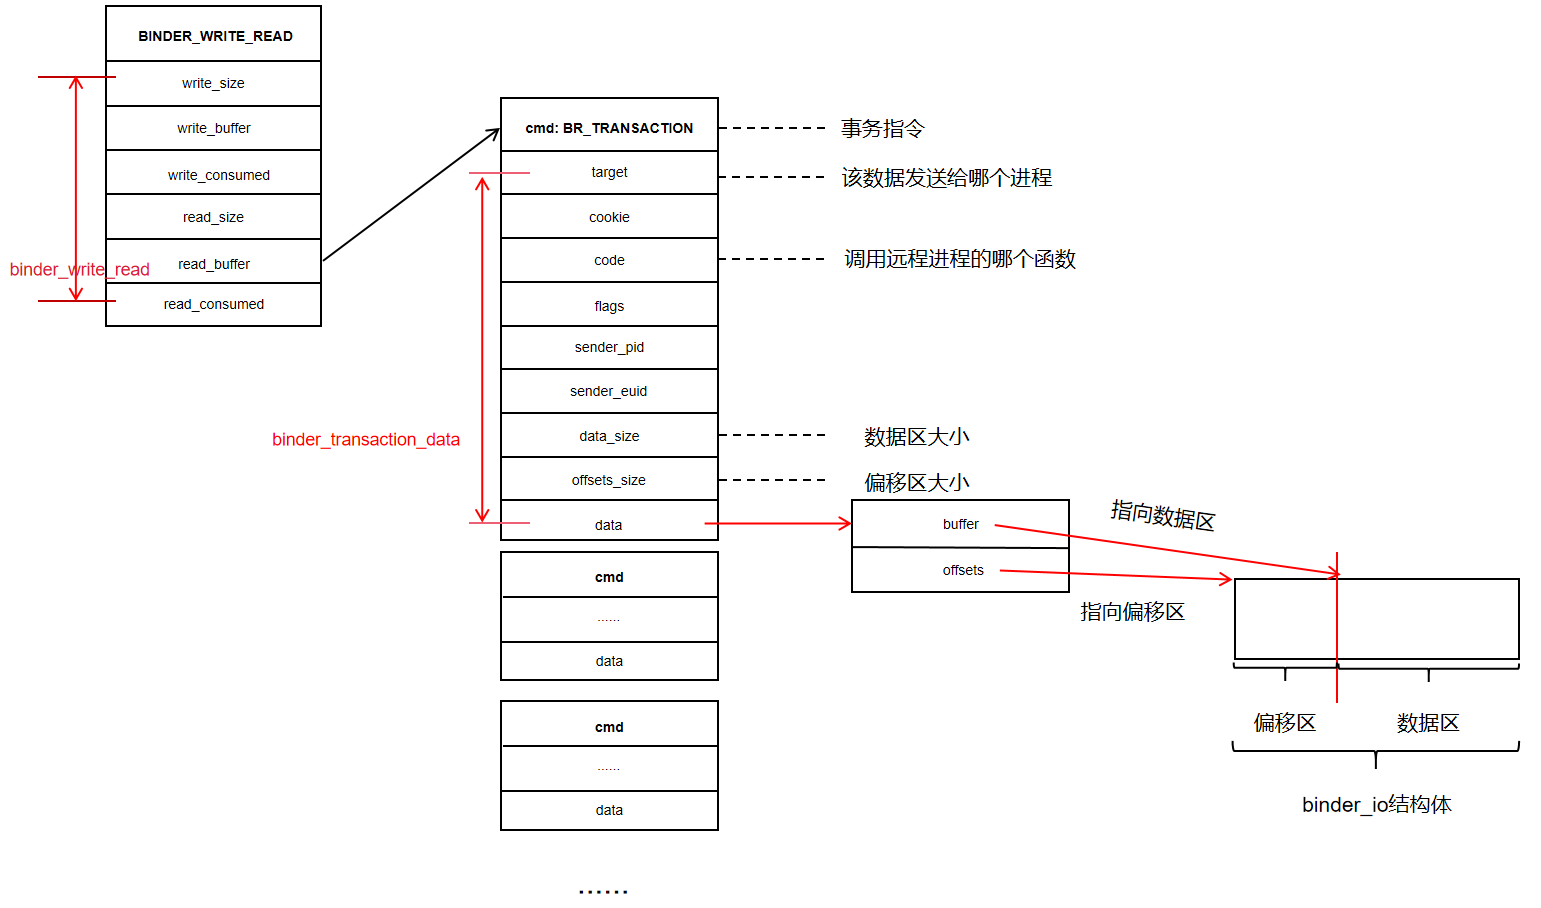
binder_write_read 是应用程序与驱动相互传递的数据,由两部分组成:
- write 部分:发送给驱动的数据
- write_buffer:指针,指向一个 writebuf 结构体
- write_size:指针指向数据的大小
- write_consumed:指针指向的数据已使用区域的数据大小
- read 部分:用于接受远程调用的返回值
- read_buffer:指针,指向一段内存,用于接收数据
- read_size:指针指向数据的大小
- read_consumed:指针指向的数据已使用区域的数据大小
关注点 1 处,主要是使用 binder_io 构建 binder_write_read 的 write_buffer 部分:
//声明
struct {
    uint32_t cmd;
    struct binder_transaction_data txn;
} __attribute__((packed)) writebuf;

//构造 writebuf
writebuf.cmd = BC_TRANSACTION;
writebuf.txn.target.handle = target;
writebuf.txn.code = code;
writebuf.txn.flags = 0;
writebuf.txn.data_size = msg->data - msg->data0;
writebuf.txn.offsets_size = ((char*) msg->offs) - ((char*) msg->offs0);
writebuf.txn.data.ptr.buffer = (uintptr_t)msg->data0;
writebuf.txn.data.ptr.offsets = (uintptr_t)msg->offs0;
bwr.write_size = sizeof(writebuf);
bwr.write_consumed = 0;

//赋值
bwr.write_buffer = (uintptr_t) &writebuf;
2
3
4
5
6
7
8
9
10
11
12
13
14
15
16
17
18
19
20
writebuffer 的结构如下图所示:
关注点 2 处,主要给 read_buffer 赋值,表示写的同时也要读取数据即等待返回值:
unsigned readbuf[32];

bwr.read_size = sizeof(readbuf);
bwr.read_consumed = 0;
bwr.read_buffer = (uintptr_t) readbuf;
2
3
4
5
关注点 3 处,发起写操作,程序进入阻塞状态,直到收到远程调用的返回数据:
res = ioctl(bs->fd, BINDER_WRITE_READ, &bwr);
# 3. Binder 服务注册过程第三阶段—— ServiceManager 收到服务注册请求
ServiceManager 收到 Server 发送的数据,并从第一阶段的阻塞休眠中唤醒过来:
流程如下图所示:
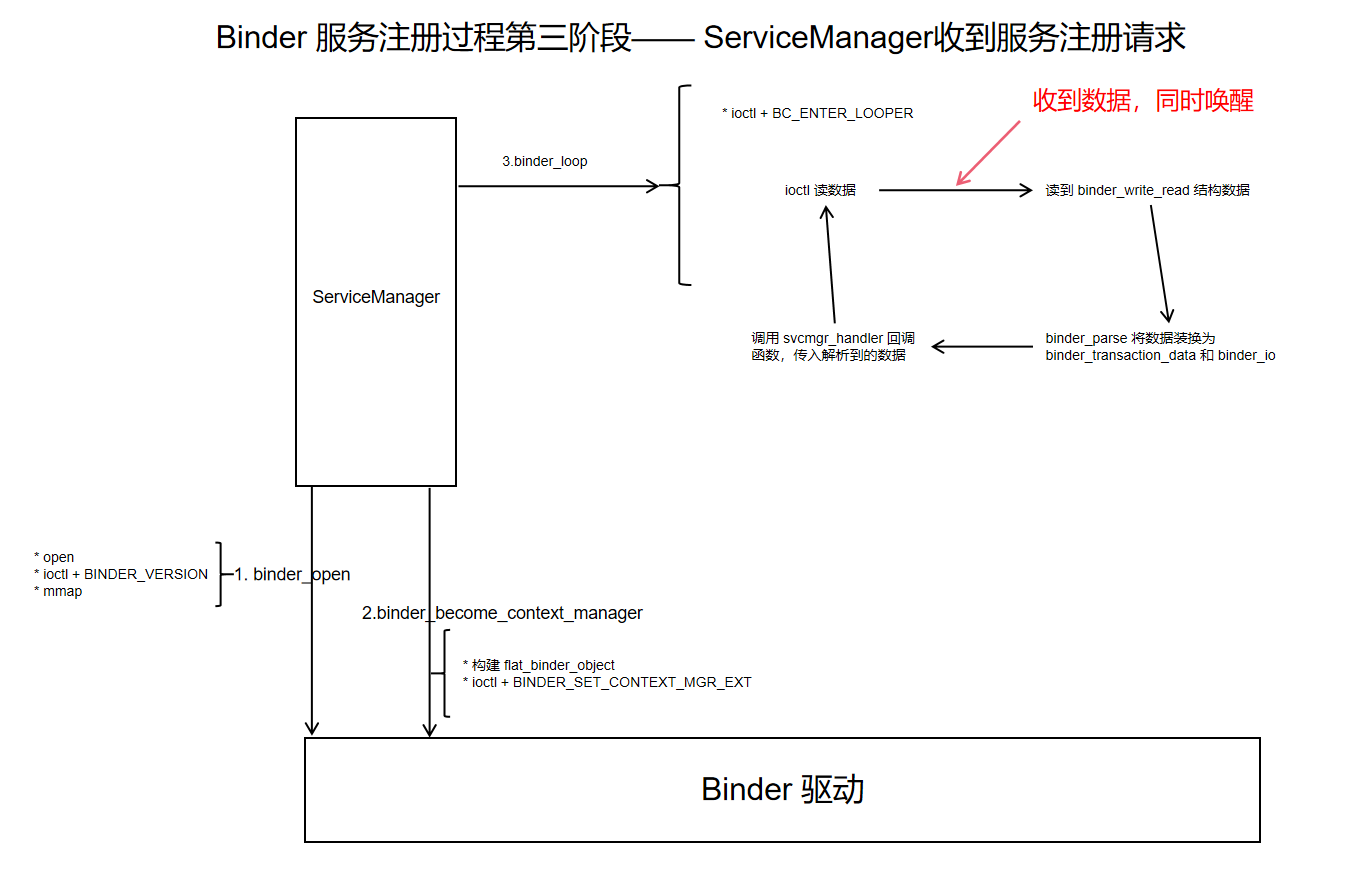
具体代码如下:
binder.c 中 binder_loop 源码:
void binder_loop(struct binder_state *bs, binder_handler func)
{
    //......
    bwr.read_size = sizeof(readbuf);
    bwr.read_consumed = 0;
    bwr.read_buffer = (uintptr_t) readbuf;

    //从这里唤醒,收到的数据保存在 bwr 变量中
    res = ioctl(bs->fd, BINDER_WRITE_READ, &bwr);

    //解析收到的数据,回调 func 方法,func 传入的是 svcmgr_handler
    res = binder_parse(bs, 0, (uintptr_t) readbuf, bwr.read_consumed, func);
    //......
}
2
3
4
5
6
7
8
9
10
11
12
13
14
收到的数据 readbuf 的格式如下:
struct {
    uint32_t cmd;
    struct binder_transaction_data txn;

    //可能存在多个数据组
    uint32_t cmd;
    struct binder_transaction_data txn;

    uint32_t cmd;
    struct binder_transaction_data txn;

    //.......
}
2
3
4
5
6
7
8
9
10
11
12
13
接下来我们看看数据的解析过程:
binder.c 中 binder_parse 源码:
int binder_parse(struct binder_state *bs, struct binder_io *bio,
                 uintptr_t ptr, size_t size, binder_handler func)
{
    int r = 1;
    uintptr_t end = ptr + (uintptr_t) size;

    while (ptr < end) {
        //解析出 readbuf 中的 cmd
        uint32_t cmd = *(uint32_t *) ptr;
        ptr += sizeof(uint32_t);


        switch(cmd) {
        //...... 省略非相关代码
        // cmd == BR_TRANSACTION
        case BR_TRANSACTION_SEC_CTX:
        case BR_TRANSACTION: {
            struct binder_transaction_data_secctx txn;
            if (cmd == BR_TRANSACTION_SEC_CTX) {
                //...... 省略非相关代码
            } else /* BR_TRANSACTION */ {
                if ((end - ptr) < sizeof(struct binder_transaction_data)) {
                    ALOGE("parse: txn too small (binder_transaction_data)!\n");
                    return -1;
                }
                //将 readbuf 中的数据解释为 binder_transaction_data 结构体
                memcpy(&txn.transaction_data, (void*) ptr, sizeof(struct binder_transaction_data));
                ptr += sizeof(struct binder_transaction_data);

                txn.secctx = 0;
            }

            binder_dump_txn(&txn.transaction_data);
            if (func) {
                unsigned rdata[256/4];
                struct binder_io msg;
                struct binder_io reply;
                int res;

                bio_init(&reply, rdata, sizeof(rdata), 4);
                //将 binder_transaction_data 数据中的 data 数据区解析到 binder_io msg 中
                bio_init_from_txn(&msg, &txn.transaction_data);
                //调用回调函数,即 svcmgr_handler 函数
                res = func(bs, &txn, &msg, &reply);
                if (txn.transaction_data.flags & TF_ONE_WAY) {
                    binder_free_buffer(bs, txn.transaction_data.data.ptr.buffer);
                } else { //走这儿
                    //将结果发送给 server 进程
                    binder_send_reply(bs, &reply, txn.transaction_data.data.ptr.buffer, res);
                }
            }
            break;
        }
        // ...... 省略非相关代码
        }
    }

    return r;
}
2
3
4
5
6
7
8
9
10
11
12
13
14
15
16
17
18
19
20
21
22
23
24
25
26
27
28
29
30
31
32
33
34
35
36
37
38
39
40
41
42
43
44
45
46
47
48
49
50
51
52
53
54
55
56
57
58
59
60
总结一下就是解析出 binder_transaction_data binder_io, 然后调用传入的回调函数 svcmgr_handler
接下来分析回调函数 svcmgr_handler 的实现:
// bs 是 binder_open 中构建的结构体
//txn_secctx 和 msg 是收到的数据
//reply 用于servicemanager 向 server 回复数据
int svcmgr_handler(struct binder_state *bs,
                   struct binder_transaction_data_secctx *txn_secctx,
                   struct binder_io *msg,
                   struct binder_io *reply)
{
    //一堆变量,暂时不管
    struct svcinfo *si;
    uint16_t *s;
    size_t len;
    uint32_t handle;
    uint32_t strict_policy;
    int allow_isolated;
    uint32_t dumpsys_priority;

    //获取到 binder_transaction_data 结构体数据
    struct binder_transaction_data *txn = &txn_secctx->transaction_data;

    //对收到的数据做一些检查,暂时不管
    if (txn->target.ptr != BINDER_SERVICE_MANAGER)
        return -1;

    if (txn->code == PING_TRANSACTION)
        return 0;

    // msg 中第一个数据一般是一个 32 位的 0
    strict_policy = bio_get_uint32(msg);
    // msg 中的第二个数据 ,一般也是 32 位的 0
    bio_get_uint32(msg);
    // msg 中的第三个数据,一个字符串,正常情况是 android.os.IServiceManager
    s = bio_get_string16(msg, &len);
    if (s == NULL) {
        return -1;
    }

    // svcmgr_id 是一个字符数组,内容是 android.os.IServiceManager
    if ((len != (sizeof(svcmgr_id) / 2)) ||
        memcmp(svcmgr_id, s, sizeof(svcmgr_id))) {
        fprintf(stderr,"invalid id %s\n", str8(s, len));
        return -1;
    }

    //selinux 相关代码 省略 ......

    //code 代表需要调用哪个函数
    switch(txn->code) {
    //获取服务
    case SVC_MGR_GET_SERVICE:
    case SVC_MGR_CHECK_SERVICE:
       //...... 省略无关代码
    //添加服务
    case SVC_MGR_ADD_SERVICE:  //代码走这里
        s = bio_get_string16(msg, &len);
        if (s == NULL) {
            return -1;
        }
        handle = bio_get_ref(msg);
        allow_isolated = bio_get_uint32(msg) ? 1 : 0;
        dumpsys_priority = bio_get_uint32(msg);
        if (do_add_service(bs, s, len, handle, txn->sender_euid, allow_isolated, dumpsys_priority,
                           txn->sender_pid, (const char*) txn_secctx->secctx))
            return -1;
        break;
    // list 已注册的服务
    case SVC_MGR_LIST_SERVICES: {
       // ...... 省略无关代码
    }
    default:
        ALOGE("unknown code %d\n", txn->code);
        return -1;
    }
    //写入返回值
    bio_put_uint32(reply, 0);
    return 0;
}
2
3
4
5
6
7
8
9
10
11
12
13
14
15
16
17
18
19
20
21
22
23
24
25
26
27
28
29
30
31
32
33
34
35
36
37
38
39
40
41
42
43
44
45
46
47
48
49
50
51
52
53
54
55
56
57
58
59
60
61
62
63
64
65
66
67
68
69
70
71
72
73
74
75
76
77
78
上面的代码从 binder_transaction_data_secctx 中获取到了code,code 代表了 server 端要执行的操作,在当前服务注册情景中,code 的值为 SVC_MGR_ADD_SERVICE,表示添加服务。
接下来我们来分析一下添加服务相关的代码:
    //添加服务
    case SVC_MGR_ADD_SERVICE:
        //获取到服务的名字
        s = bio_get_string16(msg, &len);
        if (s == NULL) {
            return -1;
        }
        //获取到服务在内核中的句柄 handle
        handle = bio_get_ref(msg);
        //暂时不管下面两个参数的作用
        allow_isolated = bio_get_uint32(msg) ? 1 : 0;
        dumpsys_priority = bio_get_uint32(msg);
        //添加服务,具体下面分析
        if (do_add_service(bs, s, len, handle, txn->sender_euid, allow_isolated, dumpsys_priority,
                           txn->sender_pid, (const char*) txn_secctx->secctx))
            return -1;
        break;
2
3
4
5
6
7
8
9
10
11
12
13
14
15
16
17
do_add_service 的实现如下:
int do_add_service(struct binder_state *bs, const uint16_t *s, size_t len, uint32_t handle,
                   uid_t uid, int allow_isolated, uint32_t dumpsys_priority, pid_t spid, const char* sid) {
    struct svcinfo *si;

    if (!handle || (len == 0) || (len > 127))
        return -1;

    //一些权限判断,暂时可以不管
    if (!svc_can_register(s, len, spid, sid, uid)) {
        ALOGE("add_service('%s',%x) uid=%d - PERMISSION DENIED\n",
             str8(s, len), handle, uid);
        return -1;
    }

    //源码中定义了一个单向链表用保存 service
    // 链表的节点是 svcinfo,是 servicemanager 对一个服务的描述或表示,链表头是 svclist,是一个全局变量
    //这里从链表中查找服务,这里是注册服务,链表中没有当前服务,查找到的值是 null
    si = find_svc(s, len); // si 为 null
    if (si) {
        if (si->handle) {
            ALOGE("add_service('%s',%x) uid=%d - ALREADY REGISTERED, OVERRIDE\n",
                 str8(s, len), handle, uid);
            svcinfo_death(bs, si);
        }
        si->handle = handle;
    } else { // 代码走这里
        //构建新的节点
        si = malloc(sizeof(*si) + (len + 1) * sizeof(uint16_t));
        if (!si) {
            ALOGE("add_service('%s',%x) uid=%d - OUT OF MEMORY\n",
                 str8(s, len), handle, uid);
            return -1;
        }
        // 保存数据,并加入链表
        si->handle = handle; //handle 保存到节点中
        si->len = len;
        // 服务的名字保存到节点中
        memcpy(si->name, s, (len + 1) * sizeof(uint16_t));
        si->name[len] = '\0';
        si->death.func = (void*) svcinfo_death;
        si->death.ptr = si;
        si->allow_isolated = allow_isolated;
        si->dumpsys_priority = dumpsys_priority;
        si->next = svclist;
        svclist = si;
    }
    //binder_ref强引用加1操作,留到内核部分讲解,这里暂时不管
    binder_acquire(bs, handle);
    //注册死亡通知,留到内核部分讲解,这里暂时不管
    binder_link_to_death(bs, handle, &si->death);
    return 0;
}
2
3
4
5
6
7
8
9
10
11
12
13
14
15
16
17
18
19
20
21
22
23
24
25
26
27
28
29
30
31
32
33
34
35
36
37
38
39
40
41
42
43
44
45
46
47
48
49
50
51
52
总结一下就是:
- 构建 svcinfo 链表节点
- 根据收到的数据,给 svcinfo 赋值
- 将 svcinfo 添加到 svclist 链表中
svcinfo 是 servicemanager 中对一个服务的描述,其中最重要的数据是 handle,用于标识一个 service,其值由驱动确定,并发送给了 servicemanger,保存在 svclist 链表中。
# 4. ServiceManager 告知 Server 服务注册完毕,Server 收到应答数据
在 svcmgr_handler 最后部分,写入返回数据:
int svcmgr_handler(struct binder_state *bs,
                   struct binder_transaction_data_secctx *txn_secctx,
                   struct binder_io *msg,
                   struct binder_io *reply)
{
    //......
    //写入返回数据
    bio_put_uint32(reply, 0);
    return 0;
}
2
3
4
5
6
7
8
9
10
在 binder_parse 中调用 binder_send_relpy 发送返回的数据。
void binder_send_reply(struct binder_state *bs,
                       struct binder_io *reply,
                       binder_uintptr_t buffer_to_free,
                       int status)
{
    //两块数据,不同的 cmd 对于不同的数据格式
    struct {
        uint32_t cmd_free;
        binder_uintptr_t buffer;
        uint32_t cmd_reply;
        struct binder_transaction_data txn;
    } __attribute__((packed)) data;

    data.cmd_free = BC_FREE_BUFFER;
    data.buffer = buffer_to_free;
    data.cmd_reply = BC_REPLY;
    data.txn.target.ptr = 0;
    data.txn.cookie = 0;
    data.txn.code = 0;
    if (status) {
        data.txn.flags = TF_STATUS_CODE;
        data.txn.data_size = sizeof(int);
        data.txn.offsets_size = 0;
        data.txn.data.ptr.buffer = (uintptr_t)&status;
        data.txn.data.ptr.offsets = 0;
    } else {
        data.txn.flags = 0;
        data.txn.data_size = reply->data - reply->data0;
        data.txn.offsets_size = ((char*) reply->offs) - ((char*) reply->offs0);
        data.txn.data.ptr.buffer = (uintptr_t)reply->data0;
        data.txn.data.ptr.offsets = (uintptr_t)reply->offs0;
    }
    binder_write(bs, &data, sizeof(data));
}
2
3
4
5
6
7
8
9
10
11
12
13
14
15
16
17
18
19
20
21
22
23
24
25
26
27
28
29
30
31
32
33
34
流程基本和 server 注册服务一直,只是这里有两块数据,同时发送给 binder 驱动。第一块数据由驱动处理,第二块数据会返回给 Server 端,Server 端从阻塞中恢复:
int binder_call(struct binder_state *bs,
                struct binder_io *msg, struct binder_io *reply,
                uint32_t target, uint32_t code)
{
        //省略部分代码 ......

        //Server 从阻塞中恢复,同时收到数据
        res = ioctl(bs->fd, BINDER_WRITE_READ, &bwr);

        if (res < 0) {
            fprintf(stderr,"binder: ioctl failed (%s)\n", strerror(errno));
            goto fail;
        }

        //解析收到的数据
        res = binder_parse(bs, reply, (uintptr_t) readbuf, bwr.read_consumed, 0);
        if (res == 0) return 0;
        if (res < 0) goto fail;

    //......
}
2
3
4
5
6
7
8
9
10
11
12
13
14
15
16
17
18
19
20
21
解析返回数据:
int binder_parse(struct binder_state *bs, struct binder_io *bio,
                 uintptr_t ptr, size_t size, binder_handler func)
{
    int r = 1;
    uintptr_t end = ptr + (uintptr_t) size;

    while (ptr < end) {
        uint32_t cmd = *(uint32_t *) ptr;
        ptr += sizeof(uint32_t);
#if TRACE
        fprintf(stderr,"%s:\n", cmd_name(cmd));
#endif
        switch(cmd) {
        //...... 省略部分代码
        case BR_REPLY: {
            struct binder_transaction_data *txn = (struct binder_transaction_data *) ptr;
            if ((end - ptr) < sizeof(*txn)) {
                ALOGE("parse: reply too small!\n");
                return -1;
            }
            binder_dump_txn(txn);
            if (bio) {
                //数据放到 bio 中,即上一层传入的 reply
                bio_init_from_txn(bio, txn);
                bio = 0;
            } else {
                /* todo FREE BUFFER */
            }
            ptr += sizeof(*txn);
            r = 0;
            break;
        }
        //省略部分代码 ......
        }
    }

    return r;
}
2
3
4
5
6
7
8
9
10
11
12
13
14
15
16
17
18
19
20
21
22
23
24
25
26
27
28
29
30
31
32
33
34
35
36
37
38
39
binder_parse 返回 0,收到的数据保存在 reply 中:
int binder_call(struct binder_state *bs,
                struct binder_io *msg, struct binder_io *reply,
                uint32_t target, uint32_t code)
{
        //binder_parse 返回
        res = binder_parse(bs, reply, (uintptr_t) readbuf, bwr.read_consumed, 0);
        if (res == 0) return 0; // 返回值是 0
        if (res < 0) goto fail;

    //......
}
2
3
4
5
6
7
8
9
10
11
binder_call 返回到 svcmgr_publish
int svcmgr_publish(struct binder_state *bs, uint32_t target, const char *name, void *ptr)
{
    //......

    //binder_call 返回 0
    if (binder_call(bs, &msg, &reply, target, SVC_MGR_ADD_SERVICE)) {
        //fprintf(stderr, "svcmgr_public 远程调用失败\n");
        return -1;
    }

    //解析返回值
    //解析出的值是 0 表示调用成功
    status = bio_get_uint32(&reply); //调用成功返回0
    //远程调用结束,通知驱动清理内存
    binder_done(bs, &msg, &reply);

    return status; //返回 0 给 main 主程序,调用成功
}
2
3
4
5
6
7
8
9
10
11
12
13
14
15
16
17
18
最后调用 binder_done 通知驱动清理内存:
void binder_done(struct binder_state *bs,
                 __unused struct binder_io *msg,
                 struct binder_io *reply)
{
    struct {
        uint32_t cmd;
        uintptr_t buffer;
    } __attribute__((packed)) data;

    if (reply->flags & BIO_F_SHARED) {
        data.cmd = BC_FREE_BUFFER;
        data.buffer = (uintptr_t) reply->data0;
        binder_write(bs, &data, sizeof(data));
        reply->flags = 0;
    }
}
2
3
4
5
6
7
8
9
10
11
12
13
14
15
16
到这里,服务的注册过程就分析完了,后面的文章我们会继续分析服务的获取和调用过程。
- 01
- 004.Vulkan绘制一个三角形3——初始化过程分析202-03
- 02
- 002.Vulkan绘制一个三角形1——概述02-03
- 03
- 003.Vulkan绘制一个三角形2——初始化过程分析102-03